Splunk App
The Splunk App for VulDB integrates vulnerability intelligence from VulDB into Splunk. The app communicates with VulDB by using its API and requires a valid API key as well as sufficient API credits.
Setup
Changelog
| Version | Date | Changes |
|---|---|---|
| 4.1.1 | 08/19/2023 | Stability improvements |
| 4.0.1 | 08/07/2023 | Updated MITRE ATT&CK matrix to version 13.1; included hints for migrating the VulDB app to a new Splunk instance |
| 4.0.0 | 05/02/2023 | Added a MITRE ATT&CK matrix visualization and a related vulnerability dashboard |
| 3.8.0 | 01/25/2023 | Polling interval is now configurable |
| 3.7.2 | 07/26/2022 | Improved secret storage application |
| 3.7.1 | 07/13/2022 | Stability improvements |
| 3.7.0 | 20/12/2021 | New VulDB logo; added support for Chinese (zh), Japanese (ja) and Arabic (ar); stability improvements |
| 3.6.0 | 08/13/2021 | Added MITRE ATT&CK techniques visualization; stability improvements |
| 3.5.2 | 12/13/2020 | Improved data retrieval strategy |
| 3.5.1 | 10/16/2020 | Improved handling of arbitrarily named indices |
| 3.5.0 | 07/09/2020 | Enhanced algorithm for update fetching |
| 3.4.1 | 04/17/2020 | Stability improvements |
| 3.4.0 | 01/21/2020 | Fetch updates more frequently; show important warnings as Bulletin Messages |
| 3.3.0 | 12/17/2019 | New feature to allow fetching individual vulnerabilities |
| 3.2.0 | 11/13/2019 | Stability improvements |
| 3.1.0 | 06/06/2019 | Use the storage passwords facility to store the API key |
| 3.0.0 | 03/21/2019 | Retrieve updates for vulnerabilities |
| 2.0.1 | 02/11/2019 | Stability improvements |
| 2.0.0 | 02/11/2019 | New and improved dashboards, user interface improvements, and 0day exploit prices |
| 1.0.1 | 10/11/2018 | Possibility to define the time-range to fetch earlier entries at the initial startup |
| 1.0.0 | 09/25/2018 | Public Release |
| 0.0.1 | 09/18/2018 | Internal Release |
Installation
- Log in to Splunk with an administrative account
- Click on the gear icon (Manage Apps)
- On the next screen, click on the button labeled Install app from file
- Click on the button Browse... and browse to the location of the the VulDB Splunk App file (VulDB-Splunk-App.tar.gz), then select that file and click Open in the file browser dialogue. Now the name of the file appears next to the button Browse....
- Check the checkbox Upgrade app to upgrade any older versions of the app should they exist
- Click the button labeled Upload
Initial Configuration
Before configuring the VulDB Splunk App for the first time, make sure that you have a valid API key and a sufficient amount of API credits. If in doubt, log in to your VulDB account and check your profile.
The VulDB Splunk App defines a new modular input type that is used for retrieving data from VulDB. Navigate to the menu Settings > Data inputs and click on + Add new.
Note: if the app has been configured previously, this step is typically not required as the required configuration should already be present.
Give the new modular input a name, for example VulDB-datasrc and insert your API key into the field VulDB API key. Optionally, you can specify a proxy server for outgoing connections, i.e. connections to https://vuldb.com from your Splunk server. You can also choose the language for the data fetched from VulDB, the choices are (actual setting in parentheses):
- English (en)
- German (de)
- Spanish (es)
- French (fr)
- Italian (it)
- Polish (pl)
- Swedish (sv)
- Chinese (zh)
- Japanese (jp)
- Arabic (ar)

Additional Information
The VulDB Splunk App downloads data from https://vuldb.com in chunks of 100 database entries and it checks for new data once per hour. Upon initial data download (i.e. no data has been downloaded previously or data is older than one month), the App attempts to download all data from VulDB that is newer than one month.
Note: This will consume roughly 1'000 API credits (or more), depending on your choice of fetching details and on the amount of vulnerabilities in VulDB for that period.
Usage
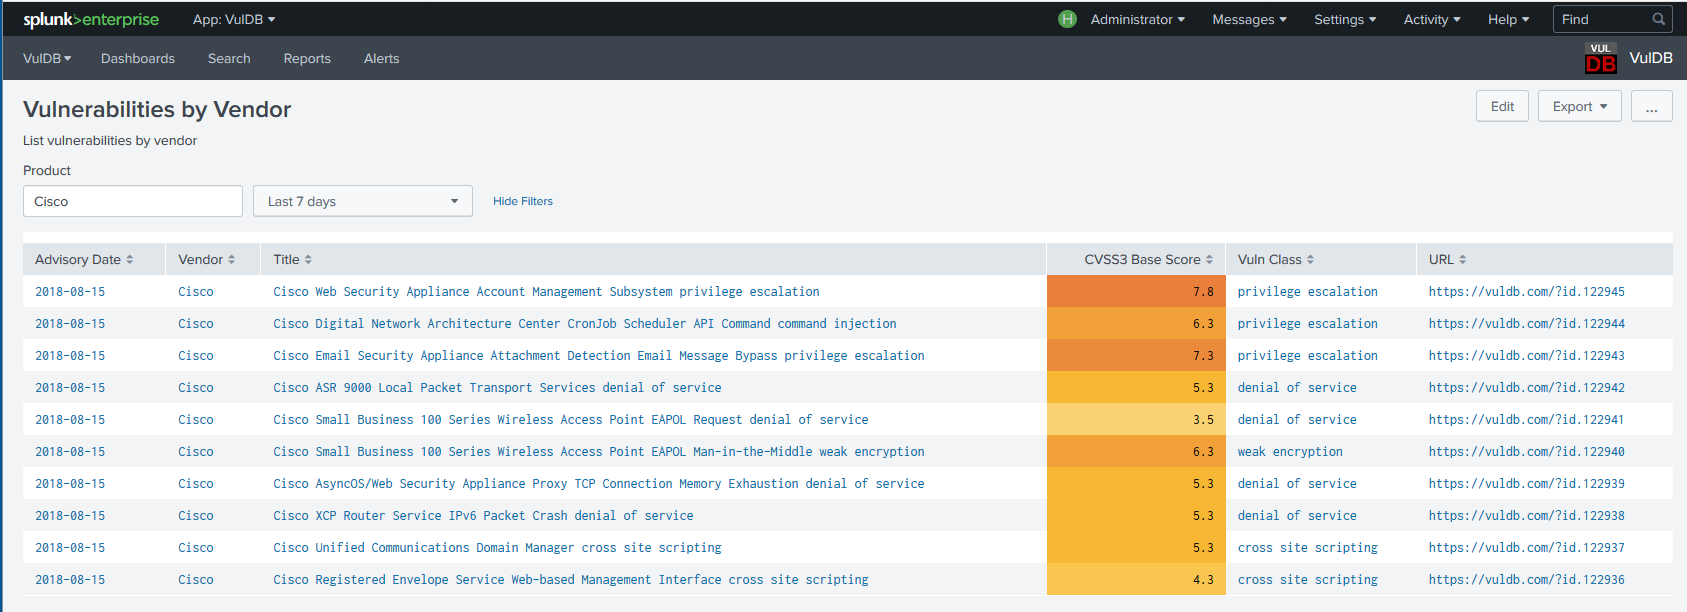
When you access the Splunk App, you are presented with an overview dashboard. This dashboard shows some statistics and visualizations of the VulDB data present in your Splunk instance. All visualizations in the overview have drilldowns defined, i.e. clicking on the numbers or graph elements will open a new window containing relevant data and details.
Dashboards
Some predefined dashboards are included with the app. They can be accessed through the menu Dashboards in the menu bar.
You can always add your own dashboards or alter the existing ones. If you choose to change any of the predefined dashboards be aware that this may lead to non-functioning drilldowns in other dashboards.
Reports and Saved Queries
Currently, only one saved search is included with the VulDB app - it will show the VulDB log entries. Feel free to add your own searches as you see fit.
Custom Searches
The VulDB app creates Splunk entries with a sourcetype of VulDB. Therefore you can use `sourcetype=VulDB` to restrict Splunk searches to VulDB data.
Logging
The VulDB Splunk App logs events to the splunk logs. A saved search is included in the VulDB app that allows you to retrieve the VulDB App logs, please click on the Reports menu access the saved search.
Administration
Changing the Splunk App Configuration
The configuration of the VulDB data source (modular input) can be changed. Click on Settings > Data inputs > VulDB, which will show the previously defined input (or an empty list if you haven't defined the input yet). Clicking on the name of the input allows you to change its parameters.
Updating the App
For instructions on how to update Splunk apps, please refer to the official Splunk documentation
Deleting the App
For instructions on how to disable or delete Splunk apps please refer to the official Splunk documentation.
Bear in mind that deleting the app will remove the defined modular input but will not remove the VulDB data already present in your Splunk instance.
Migration to a new Splunk installation
It is possible to migrate the indexed data and the state of the VulDB app to another Splunk instance. To achieve this, the indexed data in Splunk must be copied to the new installation (see the Splunk docs for details) and the state of the VulDB app must be copied to the new Splunk installation. This state is stored in the following two cursor files:
- Cursor file for new entries:
$SPLUNK_HOME/var/lib/splunk/modinputs/VulDB-datasrc/cursor - Cursor file for updates of existing entries:
$SPLUNK_HOME/var/lib/splunk/modinputs/VulDB-datasrc/last_updated
VulDB-datasrc corresponds to the name that is given to the VulDB modular input during the initial VulDB app setup (field Input Name). On Windows, adapt the paths correspondingly.
The following procedure is suggested:
- Ensure that the VulDB data indexed on the existing Splunk installation is migrated to the new Splunk instance.
- Install the VulDB app on the new Splunk instance
- Before configuring the new VulDB app for the first time, disable Internet communication for the new Splunk instance. This is to ensure data and cursor file consistency.
- Set up the new VulDB app by following the steps described in section Initial Configuration above. You can leave the field Fetch data since empty. If you have updates enabled in your existing installation, check the Update settings checkbox and the VulDB Updates checkbox. You can leave the field Date empty. Those fields are only used if no cursor files exist and we are going to use the cursor files from the existing Splunk installation.
- In the web GUI of the new Splunk installation, navigate to
Settings > Data inputs. In the section Local inputs click on the VulDB input. Its name will be the one you chose during setup. If you followed the suggestion in section Initial Configuration it will beVulDB-datasrc. Now click on Disable. - Place the configuration files (cursor and last_updated) from the old Splunk installation in the corresponding directory of the new Splunk installation.
- Enable Internet communication for the new Splunk instance
- In the web GUI of the new Splunk installation, navigate to
Settings > Data inputs. In the section Local inputs click on the VulDB input. Now click on Enable. This starts data retrieval from the API and indexing. - Observe the VulDB app logs to check if everything works as expected.
$SPLUNK_HOME to the new instance. Consult the official documentation for details.
Help and Support
Please check the documentation or contact the support team if you have any questions